Easy Add Plugins to Tai Folder Vita
The NoNpDrm plugin allows you to install official PS Vita files along with any updates or patches. For this guide, we will install NoNpDrm files on our hacked PS Vita. You must have NoNpDrm installed (steps 1-3) before you can use NoPayStation or PKGj.

Files and Programs Needed
NoNpDrm.skprx: GitHub Link
VitaShell: GitHub Link
WinSCP: WinSCP Homepage
NoNPDrm File: Google or NoPayStation PSVitaMod Page
Make sure you Enable Unsafe Homebrew in HENkaku Settings.
Once you have NoNpDrm installed (After step 3), you can go to my other guides to install PKGj or NoPayStation.
Need More Storage?
Upgrade your Micro SD Card to store more files. I got my Micro SD Card here.
Step 1: Set up Connection to WinSCP.

- Turn on the Wi-Fi on the Vita and go to VitaShell.
- Press START to bring up Main settings and change "SELECT button" to FTP, and press O to exit.
- If you don't have sd2vita installed, the USB device should be Memory Card instead.
Step 1.5: Set up Connection to WinSCP.

- Press SELECT to bring up your FTP server information.
- These numbers allow WinSCP to connect to your Vita. Leave this notification on or press X.
Note:
If you need help installing WinSCP, then see my guide here (https://psvitamod.com/set-up-ftp-connection/).
Step 2: Transfer NoNpDrm.skprx to Tai Folder
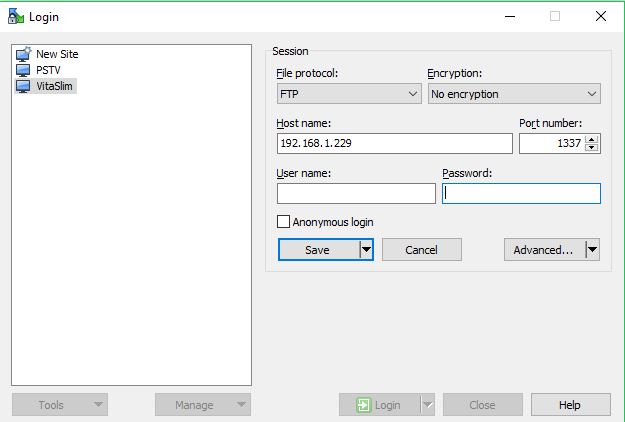
- Open WinSCP and on the login that pops up, change File Protocol to FTP.
- Enter the host name (appears after ftp://) and port # (last 4 digits after the colon)
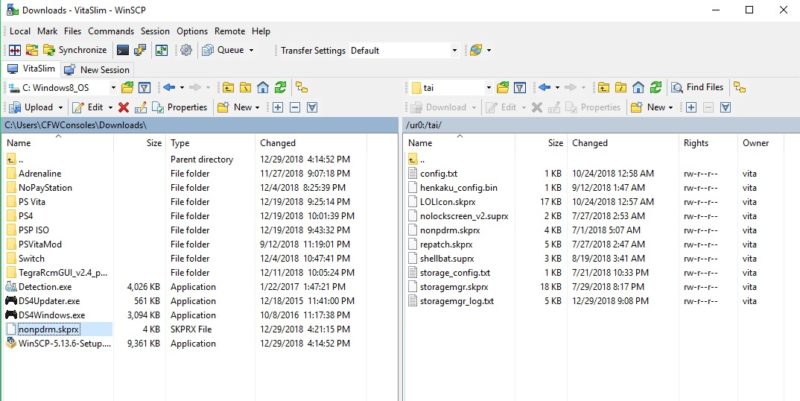
- Click Login after saving the session. Move the nonpdrm.skprx into the ur0:tai folder
- Wait till you get a notification that the file was transferred.
Note:
This guide refers to the Tai folder in the ur0 directory, this is because I moved my tai folder to ur0. If your tai folder is in ux0, considered moving it to ur0:tai, change the config.txt to refer to ur0, and delete the tai folder in ux0. Otherwise, replace all instances of ur0:tai with ux0:tai.
Step 3: Edit Config.txt file in ur0:Tai
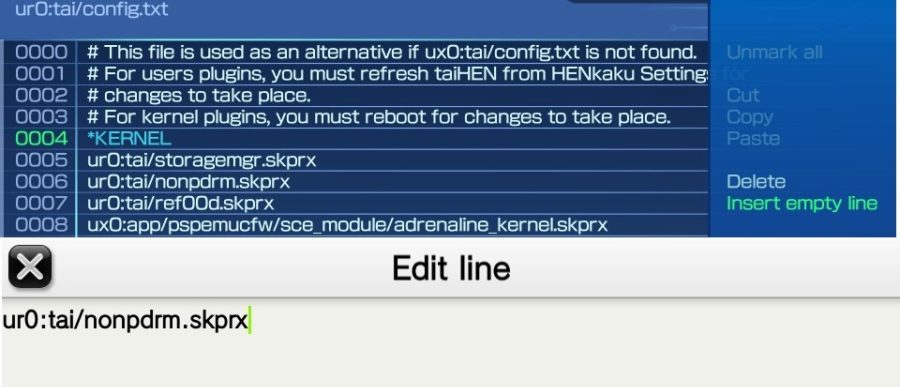
- Go to the config.txt file in the tai folder and open it by pressing X.
- Scroll down to *Kernal and press Triangle to bring up a menu.
- Press "Insert empty line" and type in ur0:tai/nonpdrm.skprx
- Make sure the ur0 is a zero and not the letter "O"
- Press O to go back out to your config file and then O again to exit.
- Press X to save your modifications.
Note:
If you want to install downloads through PKGj instead, restart your Vita after pressing X to save the modifications and then follow my PKGj guide.
Step 4: Switch to USB connection

- Press START to bring up main settings and change SELECT button to USB.
- Press SELECT to connect to your PC through USB.
- Wait for a screen to pop on your PC containing all the files on your memory card.
Step 5: Enable Hidden Folders.

- You need to enable View Hidden folders to see everything in your memory card.
- Go to View / Options /Change folder and search options / View / and select "Show hidden files, folders, and drives"
- Make sure to unchecked "Hide protected operating system files (Recommended)".
- Click Ok.
Step 6: Transfer Files to Memory Card.

- Your downloaded files will either contain an App folder or a folder that starts with a letter follow by numbers.
- In this example our file has an app folder and inside is PCSE00277.
- You should see an app folder on your memory card folder.
- Copy the PCSE00277 folder and paste it into the App folder.
- Wait for the files to finish transferring.
Step 6.5: Transfer DLC, Patches, or Licences.
- If your file contains other folders such as addcont (DLC), license, patch, app then you will need to transfer those over to the same corresponding folders on your memory card.
- If the folders are not on your memory card, then create them.

- In the diagram above, each folder will contain the ID (PCSA00147), except for license.
- You need to move each folder in the red square to the same folder in your memory card.
- Ex: Move the PCSA00147 folder in the app folder to the app folder in your memory card.
Step 7: Reset PS Vita.

- Back on the Vita press O to cancel the USB connection
- Press SELECT to bring up the main settings.
- Press Reboot on Vitashell, wait for the Vita to reset, and then launch Vitashell again.
Note:
1. Every time you add or change anything in your config.txt file you need to restart the Vita for those changes to occur.
2. If you are using the official PlayStation Vita memory you need to change your USB device to memory card. See pic below. (Thanks to Jazzman for pointing this out)

Step 8: Have VitaShell Install the File.

- Press triangle and click on Refresh LiveArea
- Press X to continue.
- The screen should say "Refreshed 1 items."
Note: If you are transferring multiple files, you only need to refresh once. In that case the screen should say "Refreshed X items" where X is the number of files you transferred.

Step 8: Go Back out to the Home Screen.
- Go back to the home screen and scroll all the way down. There should now be a bouncing bubble.
Notes: If you are getting 0 items refreshed
- It might be the file you have. Try to search for another source such as NoPayStation (https://psvitamod.com/nopaystation) or PKGj (https://psvitamod.com/pkgj).
- Games, DLCS, and updates go in ux0, but Nonpdrm.skprx should be in ur0:tai. Make sure there is no tai folder in ux0.
- If your folder has patches, DLC, etc., install just the App and see if that works.
- Please make sure you have nonpdrm.skprx under the *Kernal in config.txt and that you restarted your Vita after doing this.
- Make sure you are putting the files in the right places. Ex: Put whatever is inside the App folder of the downloaded file to the inside of the App folder in ux:0.
- Reload your taihen file in Henkaku settings.
Source: https://psvitamod.com/nonpdrm/
Post a Comment for "Easy Add Plugins to Tai Folder Vita"